This walkthrough takes you from an empty editor to a finished, exported sprite. Read the first section before you start: it explains the one idea that makes everything else in Spritory click.
Before you start: how a sprite is made
In a normal pixel editor you place every pixel by hand. In Spritory you never paint pixels. Instead, you describe the sprite and Spritory draws it for you.
- Shapes. A sprite is a stack of simple shapes, such as blobs, boxes, capsules and paths. You move, resize, rotate and layer them to build a silhouette.
- Color and surface. Each shape picks a color from your palette, such as foliage, wood or metal, and says whether it is round or flat. It points at your palette instead of storing fixed colors, so changing the palette restyles it. You can still pin a shape to an exact color when you want one.
- The look. Your palette, your light and your art style decide how those shapes turn into pixels: the colors, the shading, the outlines and the texture.
This split is why Spritory assets always match. Every sprite you make goes through the same look, so shading, outlines and colors stay the same across your whole game.


Build your first sprite
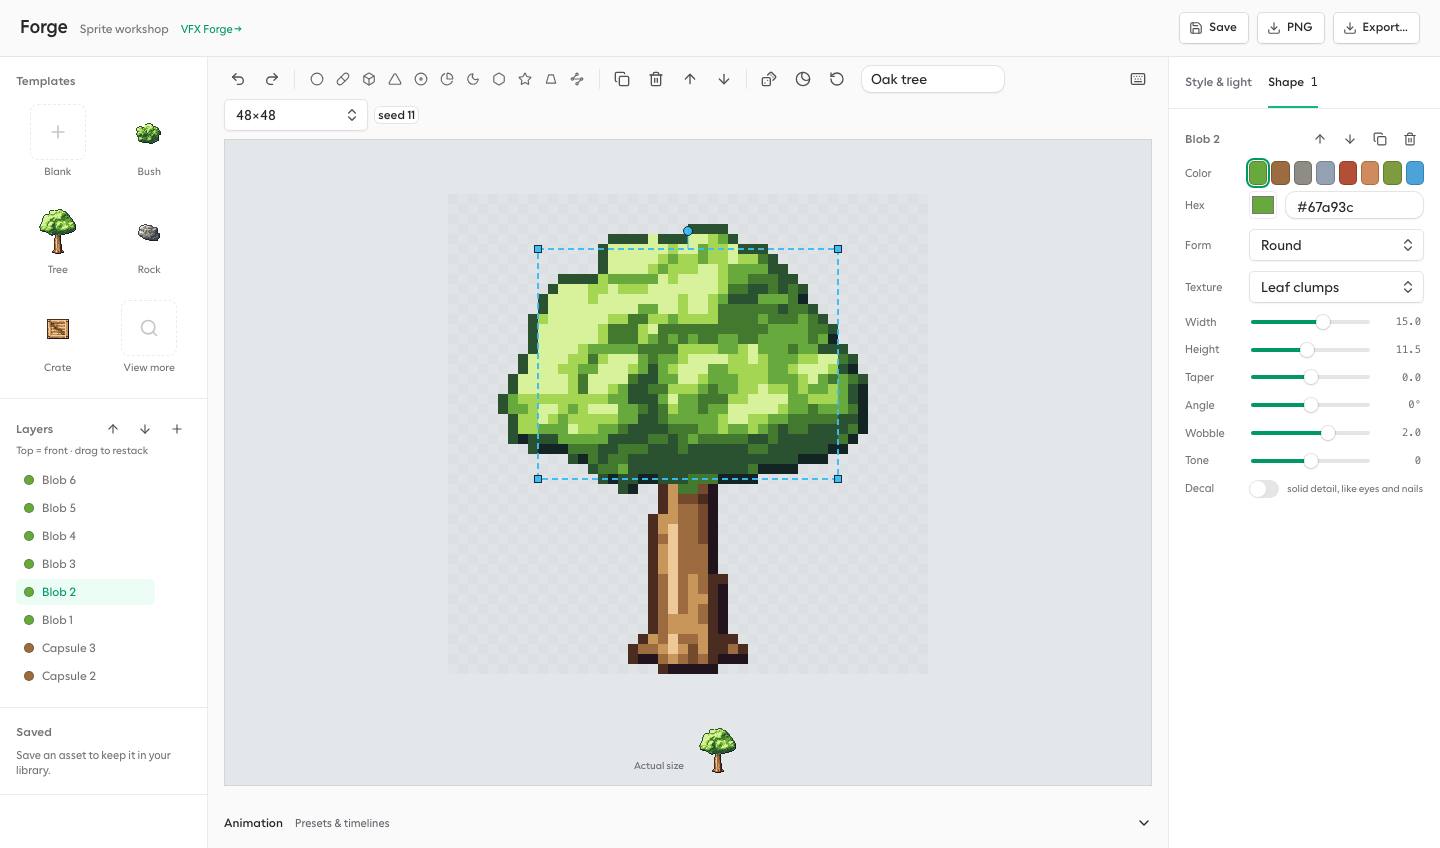
- Open the Forge
Sign in and open the Forge. You can use the editor for free. Saving and exporting come with full access.
- Pick a look
On the right, open Style & light. Choose an Art style, then a Palette. You can try out different ones to see how it affects the shapes.
- Start from a template
In Templates, click a starter such as the tree or the barrel, or click View more to search the full catalog. A template is a finished structure you can take apart and make your own. Prefer a clean slate? Start from the blank canvas.
- Make it yours
Click a shape on the canvas to select it. Drag it to move it, drag a corner handle to resize it, and drag the top handle to rotate it. Open the Shape tab to change its color, surface texture and form. Add new shapes from the strip above the canvas.
Made a mistake? ⌘Z to undo it. On Windows and Linux, use Ctrl instead of ⌘.
- Try a few variants
Click Reroll seed above the canvas. The shape and colors stay, but the surface texture changes. Keep rerolling until you like the result.
Seed A Seed B
 Seed C
- Check that it reads
Turn on Silhouette check. It flattens the sprite to one color.
- Add a little motion
Open Animation below the canvas and pick a preset such as Bob or Sway. For full control, see Animating sprites.
- Name it and save it
Type a name in the box above the canvas and press Save or ⌘S. Your sprite goes to your library.
- Export it
Click PNG for a quick single image, or Export to choose a sprite sheet, GIF or engine format. See Exporting to your game.
Build a few sprites first, then open the palette editor. Every sprite you made updates with your changes, so you can tune the look against real assets.