The Sprite Forge is where you build sprites. This page walks through each part of the editor, what the main settings do, and how light shapes your art.
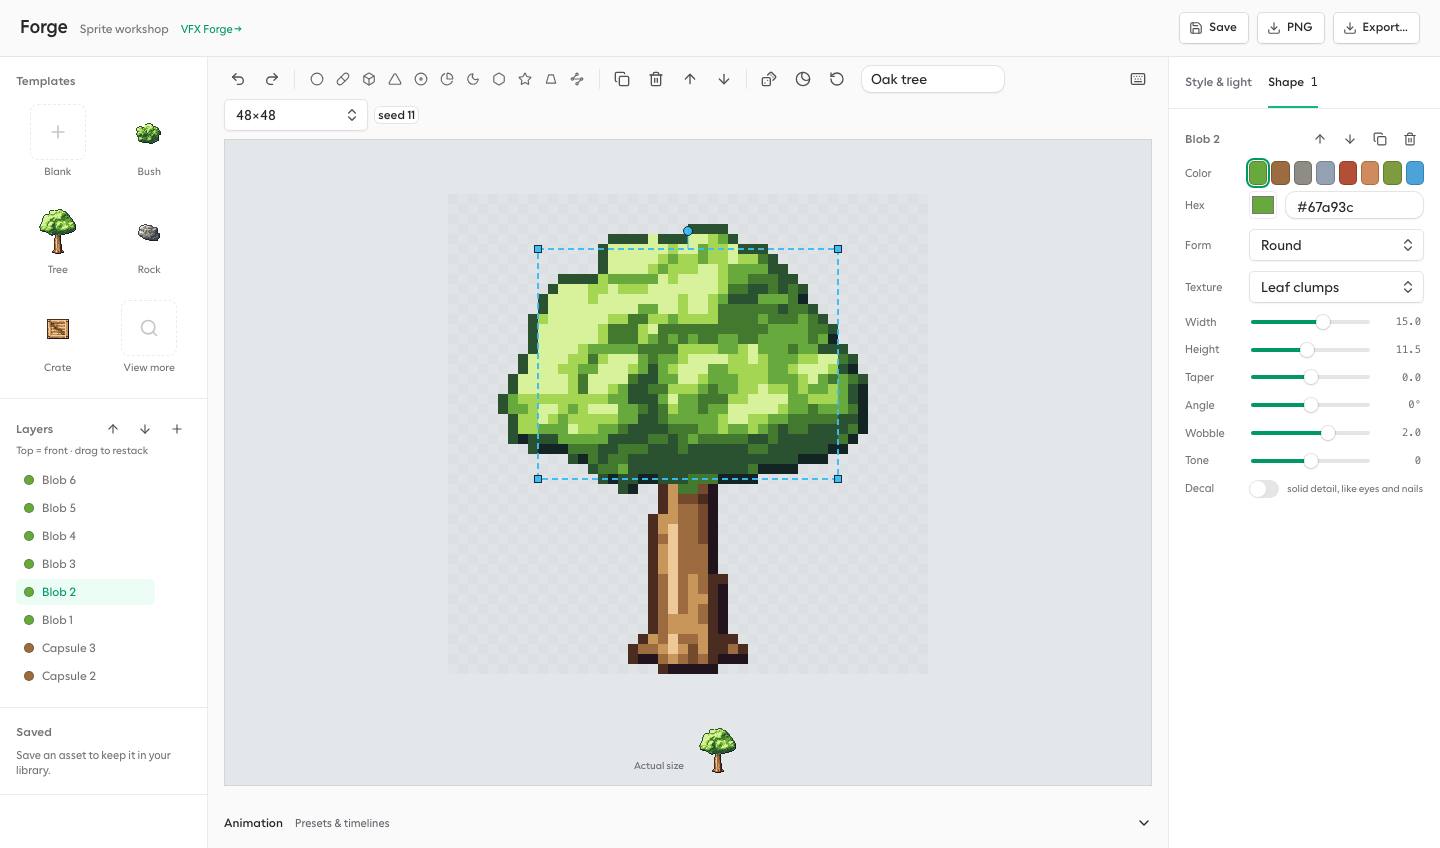
The layout
- Templates. Starter structures to build from. Click View more to search the full catalog, or start from a blank canvas.
- Layers. Every shape in the sprite, front to back. Double-click a layer to rename it, use the eye to hide it, and use Bring forward and Send backward to reorder.
- Saved. Your library of saved sprites. Click one to open it, or use Export set to export them all together.
- Canvas. Where you build. The toolbar above it adds shapes and holds undo, duplicate, delete, reroll, silhouette check and reset.
- Style & light. The art style, palette and light the sprite is drawn with.
- Shape. The settings of whatever you have selected.
- Animation. Motion presets and pose timelines, below the canvas.
Shapes
Sprites are built from simple shapes: rounded masses, blocks, wedges, curves and strokes. Hover a button in the strip above the canvas to see what a shape is good for, such as a roof, a blade or a rope. Pick the one closest to the part you are making, then adjust it until it fits.
- Start with the silhouette. Block in the big masses first and worry about detail later. If the outline reads, the sprite reads.
- Stretch a shape before adding one. Most parts come from one shape resized, rotated or tapered. Fewer shapes are easier to animate and to edit later.
- Combine for anything else. Overlap shapes to build a part no single shape covers, and hide seams by putting the front piece on top.
The top of the layer list is the front of the sprite. Arrange overlaps so that the parts closest to the viewer sit on top.
Shape settings
Select a shape and open the Shape tab. Size and angle settings depend on the shape kind. These settings apply to every shape:
- Color. Pick a color slot from your palette, such as foliage, wood or metal. The shape then follows your palette when you change it. You can also type a custom hex color, which pins that shape to one color that no longer follows palette changes.
- Form. Round shades the shape like a ball. Flat shades it like a beveled slab. Use round for organic parts and flat for boards, blades and walls.
- Texture. Adds surface detail such as leaf clumps, wood grain, stone speckle or cloth weave.
- Wobble. Roughens the edge so it looks organic. Keep it at zero for clean, manufactured parts.
- Tone. Shifts the shape lighter or darker than its neighbors, which helps separate parts that share a color.
- Decal. Draws the shape as a solid dark detail with no shading. Use it for eyes, nails, rivets and keyholes.
Select several shapes to move, rotate, duplicate or delete them together.
Art styles
The art style decides how shapes become pixels: the shading model, the outline weight, the texture and even the projection. Your palette and light apply on top of any art style.


Some art styles render at double resolution, and the output size above the picker tells you what you will export. Some art styles also handle outlines and dithering their own way, so those palette settings only apply where the style supports them.
Palette
The palette decides your colors, shading bands, outlines and texture strength. Pick a ready-made palette, create your own from the current one, or extract one from an image of art you already have. The palette has many settings, so it has its own page: Palettes and the style editor.
Light
Light decides which side of every shape is bright and which side falls into shadow. Drag the dot around the Light dial, or type an angle in degrees. The dot points to where the light comes from.


- Keep it consistent. Most games light everything from the same side. Set the angle once in your palette and leave it.
- Override it for one sprite. Turning the dial on a sprite marks the light as custom for that sprite only. Click Reset or double-click the dial to go back to the palette's light.
- Animate it. Each captured pose remembers its light, so a timeline can move the light, for example for a flickering lantern.
The palette editor also controls how high the light sits. See light direction on the palette page.
Variants and checks
Reroll seed
The seed controls the random details of surface texture. Rerolling keeps the structure and palette but gives you a new sibling, which is how you fill a forest without copies. Export a strip of seed variants from the export dialog.
Silhouette check
Flattens the sprite to one color. Game art should read from its outline alone, so use this often.
Reset to template
Brings back the template you started from, if you want to start over.
Canvas size
Choose the pixel grid from the size menu above the canvas. Your build stays centered when you resize. Size changes are blocked while an animation has captured poses, so clear the timeline first.
Keyboard shortcuts
On Windows and Linux, use Ctrl wherever you see ⌘. The keyboard button above the canvas shows this list inside the editor too.
| Click | Select a shape |
| Shift + click | Add a shape to the selection |
| Alt + click | Cycle through shapes stacked under the cursor |
| Drag on empty space | Box select |
| Drag a shape | Move in whole pixels. Hold Shift for half pixels |
| Arrow keys | Nudge the selection one pixel. Hold Shift for half a pixel |
| Corner handle | Resize. Hold Shift to keep proportions |
| Top handle | Rotate in steps. Hold Shift to rotate freely |
| ⌘A | Select all |
| ⌘C and ⌘V | Copy and paste shapes, even between assets |
| ⌘D | Duplicate |
| ⌘Z and ⇧⌘Z | Undo and redo |
| ⌘S | Save |
| Delete or Backspace | Delete the selection |
| Esc | Clear the selection |
Opening a template or a saved sprite replaces the canvas. If you have unsaved changes, the Forge asks before discarding them.